install and configure srsran(srslte) enb epc ue on ubuntu 16.04(also works for ubuntu 18.04 and 20.04)
this article introduce install and configure srslte enb epc on ubuntu 16.04
if you are from China you can download ubuntu 16.04 livecd which has been install all required package for srslte
and you can go to step 4. the livecd url: https://pan.baidu.com/s/1aQQqSlerseK_rOxHqx3Lag extract code: zs09
1. install uhd
ubuntu 16.04 apt-get have uhd package but it is old version which may have problem working with new version srslte.
if you are from China, I suggest you change apt-get source to other. I use 清华大学 source which work fine for me, open /etc/apt/sources.list and replace all the content as below:
# deb cdrom:[Ubuntu 16.04 LTS _Xenial Xerus_ - Release amd64 (20160420.1)]/ xenial main restricted
deb http://mirrors.tuna.tsinghua.edu.cn/ubuntu/ xenial main restricted
deb http://mirrors.tuna.tsinghua.edu.cn/ubuntu/ xenial-updates main restricted
deb http://mirrors.tuna.tsinghua.edu.cn/ubuntu/ xenial universe
deb http://mirrors.tuna.tsinghua.edu.cn/ubuntu/ xenial-updates universe
deb http://mirrors.tuna.tsinghua.edu.cn/ubuntu/ xenial multiverse
deb http://mirrors.tuna.tsinghua.edu.cn/ubuntu/ xenial-updates multiverse
deb http://mirrors.tuna.tsinghua.edu.cn/ubuntu/ xenial-backports main restricted universe multiverse
deb http://mirrors.tuna.tsinghua.edu.cn/ubuntu/ xenial-security main restricted
deb http://mirrors.tuna.tsinghua.edu.cn/ubuntu/ xenial-security universe
deb http://mirrors.tuna.tsinghua.edu.cn/ubuntu/ xenial-security multiverse
the source for ubuntu 18.04 is:
deb https://mirrors.tuna.tsinghua.edu.cn/ubuntu/ bionic main restricted universe multiverse
deb-src https://mirrors.tuna.tsinghua.edu.cn/ubuntu/ bionic main restricted universe multiverse
deb https://mirrors.tuna.tsinghua.edu.cn/ubuntu/ bionic-updates main restricted universe multiverse
deb-src https://mirrors.tuna.tsinghua.edu.cn/ubuntu/ bionic-updates main restricted universe multiverse
deb https://mirrors.tuna.tsinghua.edu.cn/ubuntu/ bionic-backports main restricted universe multiverse
deb-src https://mirrors.tuna.tsinghua.edu.cn/ubuntu/ bionic-backports main restricted universe multiverse
deb https://mirrors.tuna.tsinghua.edu.cn/ubuntu/ bionic-security main restricted universe multiverse
deb-src https://mirrors.tuna.tsinghua.edu.cn/ubuntu/ bionic-security main restricted universe multiverse
deb https://mirrors.tuna.tsinghua.edu.cn/ubuntu/ bionic-proposed main restricted universe multiverse
deb-src https://mirrors.tuna.tsinghua.edu.cn/ubuntu/ bionic-proposed main restricted universe multiverse
the source for ubuntu 20.04 is:
deb http://mirrors.tuna.tsinghua.edu.cn/ubuntu/ focal main restricted
deb http://mirrors.tuna.tsinghua.edu.cn/ubuntu/ focal-updates main restricted
deb http://mirrors.tuna.tsinghua.edu.cn/ubuntu/ focal universe
deb http://mirrors.tuna.tsinghua.edu.cn/ubuntu/ focal-updates universe
deb http://mirrors.tuna.tsinghua.edu.cn/ubuntu/ focal multiverse
deb http://mirrors.tuna.tsinghua.edu.cn/ubuntu/ focal-updates multiverse
deb http://mirrors.tuna.tsinghua.edu.cn/ubuntu/ focal-backports main restricted universe multiverse
deb http://mirrors.tuna.tsinghua.edu.cn/ubuntu/ focal-security main restricted
deb http://mirrors.tuna.tsinghua.edu.cn/ubuntu/ focal-security universe
deb http://mirrors.tuna.tsinghua.edu.cn/ubuntu/ focal-security multiverse
run the command below one by one:
sudo apt-get remove -y uhd
sudo apt-get remove libuhd-dev libuhd003 uhd-host -y
sudo apt-add-repository --remove "deb http://files.ettus.com/binaries/uhd/repo/uhd/ubuntu/trusty trusty main"
sudo add-apt-repository ppa:ettusresearch/uhd -y
sudo apt-get update
sudo apt-get -y --allow-unauthenticated install python python-tk libboost-all-dev libusb-1.0-0-dev
for ubuntu 16.04 and 18.04
sudo apt-get -y --allow-unauthenticated install libuhd-dev libuhd003 uhd-hostfor ubuntu 20.04:
sudo apt-get -y --allow-unauthenticated install libuhd-dev libuhd4.8.0 uhd-hostdownload usrp firmware:
sudo uhd_images_downloader -t b2xx
2. install the required package for srsran:
sudo apt-get install cmake libfftw3-dev libmbedtls-dev libboost-program-options-dev libconfig++-dev libsctp-dev git g++
3. install low latency kernel
just run:
sudo apt-get install linux-lowlatency
sudo apt-get install linux-image-`uname -r | cut -d- -f1-2`-lowlatency
sudo apt-get install linux-headers-`uname -r | cut -d- -f1-2`-lowlatency
4. download and compile srsran:
git clone https://github.com/srsRAN/srsRAN.git
cd srsRAN
git checkout release_21_04
mkdir build
cd build
cmake ../
make
make test
sudo make install
sudo ldconfig
here use release 21.04 you can also use other release or master branch.
5. configure epc and enb:
enb:
cp srsenb/enb.conf.example srsenb/enb.conf
cp srsenb/rr.conf.example srsenb/rr.conf
cp srsenb/sib.conf.example srsenb/sib.conf
cp srsenb/drb.conf.example srsenb/drb.conf
epc:
cp srsepc/epc.conf.example srsepc/epc.conf
cp srsepc/user_db.csv.example srsepc/user_db.csv
edit enb.conf set dl_earfcn = 400 and set rrc_inactivity_timer larger we can set rrc_inactivity_timer=9000000
6.write sim card and configure hss
if you are use using srsue then ignore this step goto step 7
use a blank lte usim card and a sim card writer and download sim card write software from GRSIMWrite 3.10.rar (2 MB). open the sim card write software

write imsi, ki, opc as you want. and click the "same with lte" button on the "GSM Parameter" part. finally click "Write Card" button.
open user_db.csv file add line in below way, (imsi), (ki), (opc) should be copy from the sim card write software.
ue3,mil,(imsi),(ki),opc,(opc),8000,000000001f24,7,dynamicin my case it is:
ue3,mil,208920000008856,7DBAB53F6569B7588734007D6C5CE783,opc,4DDB98237B1F6B3E64D74BF85B51BF76,8000,000000001f24,7,dynamic
7. configure srsue
if you are using cots ue then ignore this step.
run:
cp srsue/ue.conf.example srsue/ue.confedit ue.conf set dl_earfcn = 400
the default usim information is:
[usim]
mode = soft
algo = xor
#opc  = 63BFA50EE6523365FF14C1F45F88737D
k    = 00112233445566778899aabbccddeeff
imsi = 001010123456789
imei = 353490069873319
#reader =
#pin  = 1234
the information also in the default user_db.csv so do not need to modify.
8. run srslte and connect ue
run epc:
cd srsRAN/srsepc
sudo srsepc epc.conf
run enb:
cd srsRAN/srsenb
sudo srsenb enb.conf
then run:
ifconfigthe srsenb ip is like this:
srs_spgw_sgi Link encap:UNSPEC  HWaddr 00-00-00-00-00-00-00-00-00-00-00-00-00-00-00-00
          inet addr:172.16.0.1  P-t-P:172.16.0.1  Mask:255.255.255.0
          inet6 addr: fe80::9084:4d7c:40ed:6ca/64 Scope:Link
          UP POINTOPOINT RUNNING NOARP MULTICAST  MTU:1500  Metric:1
          RX packets:2 errors:0 dropped:0 overruns:0 frame:0
          TX packets:95 errors:0 dropped:0 overruns:0 carrier:0
          collisions:0 txqueuelen:500
          RX bytes:96 (96.0 B)  TX bytes:7248 (7.2 KB)
now connect ue.
for cots ue:
insert the written usim card to a phone then search network manually. the phone should be able to find your lte network.
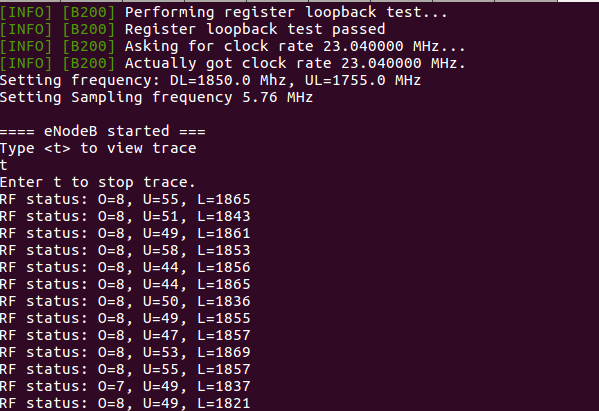
you can type "t" on srsenb if shows this kind of message like below picture then it means your pc is not powerful enough to run enb. you need to use smaller prb or use more power pc.
for srsue:
cd srsRAN/srsue
sudo srsue ue.conf
after connect to enb you need to keep ping the enb unless the ue will disconnect soon.
ping 172.16.0.1
9. connect ue to internet
cd srsepc
sudo ./srsepc_if_masq.sh enp1s0
enp1s0 is the network interface on pc. you need to change it to your network interface name.
10. use usrp b210 external 10Mhz clock
if you want to use usrp b210 external 10Mhz clock then you need to configure enb.conf
open enb.conf find below line:
#device_argsmodify to
device_args = clock=external